Maple Evaporation
Evaporating
Sap-to-syrup is generally a 40:1 (?) ratio. Keeping a lid on the boiling pot helps keep the fire warm, but it will evaporate quicker without a lid, so you should vary between the two every half hour or so. You will want to occasionally stir the sap to speed up the boil. It also helps speed things up, if you keep at least 2 pots boiling, 1 with fresh sap, 1 with half-boiled sap, and combine them every few hours. Never let sap boil get too low, it will make burnt sugar candy.
Propane Evaporator
We began by using a propane stove, with 1 large pan over 2 burners, and 2 smaller pots on the other 2 burners. Propane adds production cost, however, so you are cutting into an already small profit margin. - 1 large cooker pot
- 2 medium cooker pots
- 1 broken propane stove
- 1 propane hose + regulator
- 2 propane tanks + wrench
- 1 small ladel & 2 cups & 1 sifter
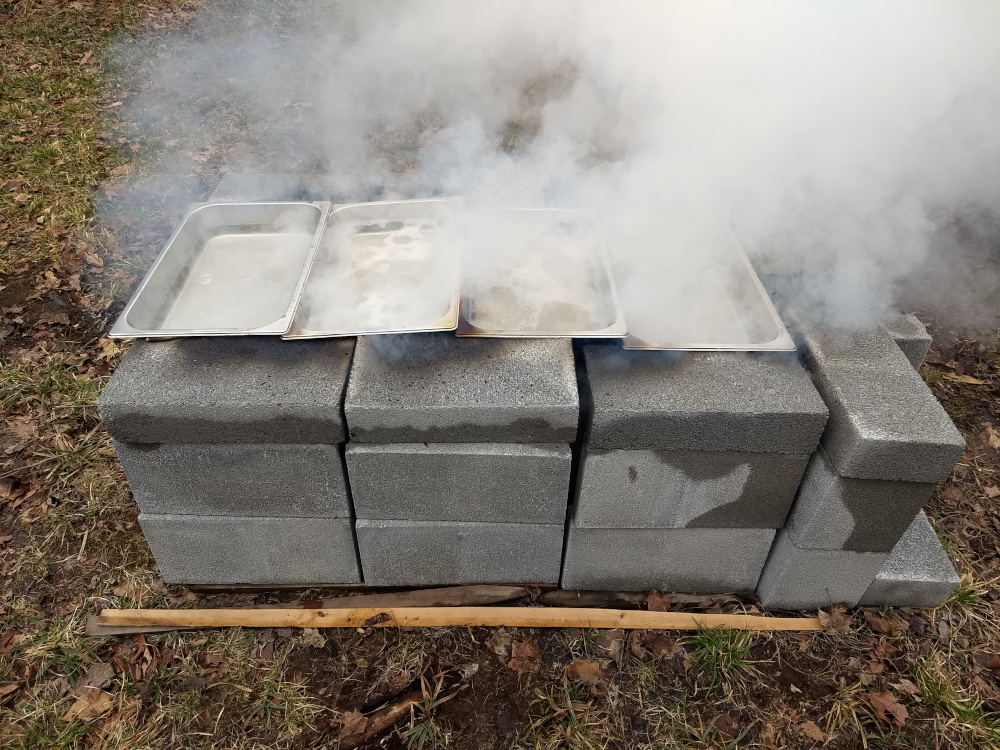
Open Flame Evaporator
In year 3, we switched to an open firepit, consisting of 16 cinder blocks (2 rows x 8 columns (6 side + 2 back)) measuring x feet wide and x feet long. We lined the insides with firebricks, and installed a chimney. Over the firepit, we ran 4 full-size steam trays (?x?). This helped gives us more surface area, which is key. Sap only needs to be an inch or two deep, but the more surface area, the more volume you can process.
- 4 full size steam trays
- firepit w/16 cinder blocks & fire bricks
- 4 oven racks
- fire wood & fire starter & cardboard & kerosene
- propane tank & torch
- 1 large ladel & 1 sifter
Barrel Evaporator
We also boil over our barrelpit. There is not much surface area, so one large pot will do.
- 1 barrelpit, 1 metal grate
- 1 large cooker pot
Kitchen Supplies
Mass evaporation is best done outside, so that you don't make your walls sticky, but for the end boil, this is best done over a stove, where you can monitor the end boil to prevent burning the syrup. Use a sifter (?) to remove any unwanted debris like leaves and dirt. Keep an eye as the bubbles change in size. When the boil temp reaches 220 (?), and stirring creates foam, it is time to stop. Place a mason jar in the sink, use oven mitts and the sifter (or a funnel) to dump the syrup into the jar. Wait a minute or so to avoid burning yourself, remove from sink, and cap the jar. After about 15-20 (?) minutes you will hear a pop as the heat from the syrup seals the jar. You should clean your walls at the season, as there will be some stickiness.
- 4 small cooker pots
- 1 kitchen ladel & 1 sifter
- temperature gun
- oven mitts
Harvest Supplies
Jars should be marked with name of harvester, harvest location, volume, and date. Syrup will keep up to a year (?) at room temperature. Once opened, it will need to refrigerated, and the shelf-life decreases to about a month (?), so avoid opening until ready for use.
- 6 mason jars
- Labels
- refrigerator for open jars